REST APIからComputeインスタンスの起動・停止を行う。
Oracle Cloud always free Advent Calendar 2019の11日目です。
12/10のユーザの作成~APIキーの作成までおこなっていることが前提となります。
#REST API発行するサンプルシェルのダウンロード
wget https://docs.cloud.oracle.com/iaas/Content/Resources/Assets/signing_sample_bash.txt
mv signing_sample_bash.txt oci-curl.sh
chmod +x oci-curl.sh
oci-curl.shを編集する。
tenancyId・・・・テナンシのOCID
authUserId・・・・REST APIを発行するユーザーのOCID
keyFingerprint・・・・REST APIを発行するユーザーのAPI KEYのkeyFingerprint
privateKeyPath・・・・REST APIを発行するユーザーの秘密鍵
#空のjsonファイル作成 (jsonの空要素{}ではダメで空ファイルであることが必要)
touch empty.json
#読み込み
source oci-curl.sh
#VM停止
#ocid1.instance~の部分が操作対象のコンピュートインスタンスのOCID、
#actions=の後が行いたいアクション
oci-curl iaas.ap-tokyo-1.oraclecloud.com post ./empty.json "/20160918/instances/ocid1.instance.oc1.ap-tokyo-1.anxhiljrzww3oficeo6igkzvj75zqvyytzzavjreb3k5mcpesbrqznfqx3aq?action=STOP"
Oracle Cloud Infrastructureから確認すると、インスタンスが停止していることが確認できます。
#起動
oci-curl iaas.ap-tokyo-1.oraclecloud.com post ./empty.json "/20160918/instances/ocid1.instance.oc1.ap-tokyo-1.anxhiljrzww3oficeo6igkzvj75zqvyytzzavjreb3k5mcpesbrqznfqx3aq?action=START"
#起動
[opc@docker vmoperator]$ oci-curl iaas.ap-tokyo-1.oraclecloud.com post ./empty.json "/20160918/instances/ocid1.instance.oc1.ap-tokyo-1.anxhiljrzww3oficeo6igkzvj75zqvyytzzavjreb3k5mcpesbrqznfqx3aq?action=START"
Oracle Cloud Infrastructureから確認すると起動していることが確認できます。
<参考>
ユーザー・グループの作成・ポリシーの割り当てをoci cliから行う
Oracle Cloud always free Advent Calendar 2019の10日目です。
今日は、VM起動停止を行うOCIユーザをOCI CLIで作成してみます。
(実際にVM起動停止を行うのは後日やります)
流れは、
ユーザ作成、
グループ作成、
グループにユーザの割り当て、
グループにポリシー(権限)の割り当て
となります。
#ユーザの作成 (実行結果のid (user OCID)を控えておく)
oci iam user create --name vmoperator --description vmoperator
#グループの作成 (実行結果のid (group OCID)を控えておく)
oci iam group create --name vmoperator_group --description vmoperator_group
#グループへユーザの割り当て(user-idとgroup-idは先ほど作成したユーザーとグループのID)
oci iam group add-user \
--user-id ocid1.user.oc1..aaaaaaaaiwmlhkfv2nek4r7sk4av3jhz5jwyl23suvvwcjXXXXXXX \
--group-id ocid1.group.oc1..aaaaaaaazgetyuvrdag3ofrjedzq3f3a3d7b7gfnvin66pkXXXXXX
#ポリシーの作成。ポリシーはグループに割り当てる
#割り当てるポリシーはテナンシ内のVM管理
oci iam policy create --name vmoperator_policy \
--statements '["Allow group vmoperator_group to manage instance-family in tenancy"]' \
--description vmoperator_group_policy
#AUTHトークンの作成
#今回は使用しません。ADWなどで使用する場合があります。
oci iam auth-token create \
--user-id ocid1.user.oc1..aaaaaaaaiwmlhkfv2nek4r7sk4av3jhz5jwyl2XXXXXXXX \
--description vmoperator
#APIキーの作成
#ここで新規にAPIキーを作成する(oci cliのAPIキーと分けたいため)
mkdir vmoperator
cd vmoperator
oci setup key
oci setup keys --output-dir .
Enter a passphrase for your private key (empty for no passphrase):
Public key written to: ./oci_api_key_public.pem
Private key written to: ./oci_api_key.pem
Public key fingerprint: ad:fd:82:7a:b5:42:82:df:47:37:e9:b0:ac:b9:82:d1
oci iam user api-key upload \
--key-file ~/vmoperator/oci_api_key_public.pem \
--user-id ocid1.user.oc1..aaaaaaaaiwmlhkfv2nek4r7sk4av3jhz5jwyl23suvvXXXXXXX
<オプション Oracle Cloud Infrastractureへログインする場合>
#Oracle Cloud Infrastractureへのログインパスワード発行
oci iam user ui-password create-or-reset \
--user-id ocid1.user.oc1..aaaaaaaaiwmlhkfv2nek4r7sk4av3jhz5jwyl23suvvwXXXXXX
Oracle Cloud Infrastractureへログインするとパスワード変更が促されますので、パスワード変更をします。
<参考>
ansibleを使って、iperfでalway free間のネットワークスループットを計測する
Oracle Cloud always free Advent Calendar 2019の9日目です。
本日は、iperfでalway free間のネットワークスループットを計測してみます。
2台でiperfのインストール、firewalldのポート開放などがあるので、ansibleでやってみます。
〇セキュリティリストの確認
oracle cloudコンソールから
ネットワーキング-仮想クラウド・ネットワーク-VirtualCloudNetwork-XXXXXXXを選択
パブリック・パブリックサブネットをクリック
Default Security List for VirtualCloudNetwork-XXXXXXXXXをクリック
イングレス・ルールに以下があることを確認
ソース 10.0.0.0/24
IPプロトコル すべて
#作業用ディレクトリの作成
[opc@docker ~]$ mkdir iperf3
[opc@docker ~]$ cd iperf3
[opc@docker iperf3]$
#hostsファイルの作成
#iperfのサーバ、クライアントのIPを変数化
export iperfserver="10.0.0.3"
export iperfclient="10.0.0.5"
#ansible hostファイルの作成
#ここでSSHポート(54222)、秘密鍵の指定
cat <<EOF > hosts
[iperfserver]
$iperfserver
[iperfclient]
$iperfclient[all:vars]
ansible_port=54222
ansible_user=opc
ansible_ssh_private_key_file=~/id_rsa2
EOF
#ansible-playbookの作成
cat <<EOF > iperf.yml
- hosts: all
become: yes
tasks:
- name: install iperf3
yum:
name:
- iperf3- name: firewalld 5201/tcp
firewalld:
port: 5201/udp
permanent: yes
state: enabled
immediate: true
- name: firewalld 5201/udp
firewalld:
port: 5201/tcp
permanent: yes
state: enabled
immediate: true
- hosts: iperfserver
become: yes
tasks:
- name: start server iperf
shell: iperf3 --server --one-off --daemon
- hosts: iperfclient
become: yes
tasks:
- name: start client iperf
shell: iperf3 --client {{ hostvars[groups['iperfserver'][0]]['ansible_ens3']['ipv4']['address'] }} --time 60
register: iperf_result
- debug: var=iperf_result.stdout_lines
EOF
#ansible-playbookの実行
[opc@docker iperf3]$ ansible-playbook -i hosts iperf.yml
PLAY [all] ***********************************************************************************************************************************************TASK [Gathering Facts] ***********************************************************************************************************************************
ok: [10.0.0.5]
ok: [10.0.0.3]
・・・
TASK [start client iperf] ********************************************************************************************************************************
changed: [10.0.0.5]TASK [debug] *********************************************************************************************************************************************
ok: [10.0.0.5] => {
"iperf_result.stdout_lines": [
"Connecting to host 10.0.0.3, port 5201",
"[ 4] local 10.0.0.5 port 29044 connected to 10.0.0.3 port 5201",
"[ ID] Interval Transfer Bandwidth Retr Cwnd",
"[ 4] 0.00-1.00 sec 88.4 MBytes 741 Mbits/sec 1067 332 KBytes ",
"[ 4] 1.00-2.00 sec 56.2 MBytes 472 Mbits/sec 692 393 KBytes ",
"[ 4] 2.00-3.00 sec 57.5 MBytes 482 Mbits/sec 895 131 KBytes ",
"[ 4] 3.00-4.00 sec 56.2 MBytes 472 Mbits/sec 615 43.7 KBytes ",
"[ 4] 4.00-5.00 sec 47.5 MBytes 398 Mbits/sec 461 280 KBytes ",
"[ 4] 5.00-6.00 sec 36.2 MBytes 304 Mbits/sec 367 568 KBytes ",
"[ 4] 6.00-7.00 sec 80.0 MBytes 671 Mbits/sec 1370 78.6 KBytes ",
"[ 4] 7.00-8.00 sec 46.2 MBytes 388 Mbits/sec 415 17.5 KBytes ",
"[ 4] 8.00-9.00 sec 63.8 MBytes 535 Mbits/sec 1060 78.6 KBytes ",
"[ 4] 9.00-10.00 sec 55.0 MBytes 461 Mbits/sec 500 96.1 KBytes ",
"[ 4] 10.00-11.00 sec 51.2 MBytes 430 Mbits/sec 425 315 KBytes ",
"[ 4] 11.00-12.00 sec 61.2 MBytes 514 Mbits/sec 676 603 KBytes ",
"[ 4] 12.00-13.00 sec 61.2 MBytes 514 Mbits/sec 674 1.08 MBytes ",
"[ 4] 13.00-14.00 sec 50.0 MBytes 419 Mbits/sec 760 175 KBytes ",
"[ 4] 14.00-15.00 sec 55.0 MBytes 461 Mbits/sec 464 61.2 KBytes ",
"[ 4] 15.00-16.00 sec 65.0 MBytes 545 Mbits/sec 793 848 KBytes ",
"[ 4] 16.00-17.00 sec 53.8 MBytes 451 Mbits/sec 591 69.9 KBytes ",
"[ 4] 17.00-18.00 sec 52.5 MBytes 440 Mbits/sec 819 166 KBytes ",
"[ 4] 18.00-19.00 sec 67.5 MBytes 566 Mbits/sec 691 8.74 KBytes ",
"[ 4] 19.00-20.00 sec 57.5 MBytes 482 Mbits/sec 483 87.4 KBytes ",
"[ 4] 20.00-21.00 sec 53.8 MBytes 451 Mbits/sec 369 874 KBytes ",
"[ 4] 21.00-22.00 sec 47.5 MBytes 398 Mbits/sec 661 8.74 KBytes ",
"[ 4] 22.00-23.00 sec 68.8 MBytes 577 Mbits/sec 673 35.0 KBytes ",
"[ 4] 23.00-24.00 sec 57.5 MBytes 481 Mbits/sec 584 463 KBytes ",
"[ 4] 24.00-25.00 sec 56.2 MBytes 473 Mbits/sec 720 140 KBytes ",
"[ 4] 25.00-26.00 sec 56.2 MBytes 472 Mbits/sec 773 35.0 KBytes ",
"[ 4] 26.00-27.00 sec 51.2 MBytes 430 Mbits/sec 437 629 KBytes ",
"[ 4] 27.00-28.00 sec 62.5 MBytes 524 Mbits/sec 734 114 KBytes ",
"[ 4] 28.00-29.00 sec 48.8 MBytes 409 Mbits/sec 617 184 KBytes ",
"[ 4] 29.00-30.00 sec 57.5 MBytes 482 Mbits/sec 561 489 KBytes ",
"[ 4] 30.00-31.00 sec 65.0 MBytes 545 Mbits/sec 717 43.7 KBytes ",
"[ 4] 31.00-32.00 sec 51.2 MBytes 430 Mbits/sec 529 61.2 KBytes ",
"[ 4] 32.00-33.00 sec 61.2 MBytes 514 Mbits/sec 764 26.2 KBytes ",
"[ 4] 33.00-34.00 sec 52.5 MBytes 440 Mbits/sec 352 778 KBytes ",
"[ 4] 34.00-35.00 sec 61.2 MBytes 514 Mbits/sec 534 253 KBytes ",
"[ 4] 35.00-36.00 sec 56.2 MBytes 472 Mbits/sec 917 114 KBytes ",
"[ 4] 36.00-37.00 sec 52.5 MBytes 440 Mbits/sec 769 69.9 KBytes ",
"[ 4] 37.00-38.00 sec 53.8 MBytes 451 Mbits/sec 520 481 KBytes ",
"[ 4] 38.00-39.00 sec 52.5 MBytes 440 Mbits/sec 613 638 KBytes ",
"[ 4] 39.00-40.00 sec 67.5 MBytes 566 Mbits/sec 771 1.20 MBytes ",
"[ 4] 40.00-41.00 sec 56.2 MBytes 472 Mbits/sec 686 1014 KBytes ",
"[ 4] 41.00-42.00 sec 56.2 MBytes 472 Mbits/sec 665 78.6 KBytes ",
"[ 4] 42.00-43.00 sec 60.0 MBytes 503 Mbits/sec 778 26.2 KBytes ",
"[ 4] 43.00-44.00 sec 45.0 MBytes 377 Mbits/sec 384 8.74 KBytes ",
"[ 4] 44.00-45.00 sec 67.5 MBytes 566 Mbits/sec 384 1.38 MBytes ",
"[ 4] 45.00-46.00 sec 56.2 MBytes 471 Mbits/sec 896 35.0 KBytes ",
"[ 4] 46.00-47.00 sec 56.2 MBytes 473 Mbits/sec 540 96.1 KBytes ",
"[ 4] 47.00-48.00 sec 57.5 MBytes 482 Mbits/sec 487 253 KBytes ",
"[ 4] 48.00-49.00 sec 53.8 MBytes 451 Mbits/sec 578 61.2 KBytes ",
"[ 4] 49.00-50.00 sec 51.2 MBytes 430 Mbits/sec 595 533 KBytes ",
"[ 4] 50.00-51.00 sec 60.0 MBytes 503 Mbits/sec 730 1.12 MBytes ",
"[ 4] 51.00-52.00 sec 62.5 MBytes 524 Mbits/sec 1042 551 KBytes ",
"[ 4] 52.00-53.00 sec 57.5 MBytes 482 Mbits/sec 646 69.9 KBytes ",
"[ 4] 53.00-54.00 sec 56.2 MBytes 472 Mbits/sec 473 87.4 KBytes ",
"[ 4] 54.00-55.00 sec 53.8 MBytes 451 Mbits/sec 563 944 KBytes ",
"[ 4] 55.00-56.00 sec 55.0 MBytes 461 Mbits/sec 531 78.6 KBytes ",
"[ 4] 56.00-57.00 sec 55.0 MBytes 462 Mbits/sec 274 52.4 KBytes ",
"[ 4] 57.00-58.00 sec 51.2 MBytes 430 Mbits/sec 687 245 KBytes ",
"[ 4] 58.00-59.00 sec 68.8 MBytes 577 Mbits/sec 746 166 KBytes ",
"[ 4] 59.00-60.00 sec 51.2 MBytes 430 Mbits/sec 398 717 KBytes ",
"- - - - - - - - - - - - - - - - - - - - - - - - -",
"[ ID] Interval Transfer Bandwidth Retr",
"[ 4] 0.00-60.00 sec 3.35 GBytes 479 Mbits/sec 38516 sender",
"[ 4] 0.00-60.00 sec 3.34 GBytes 479 Mbits/sec receiver",
"",
"iperf Done."
]
}PLAY RECAP ***********************************************************************************************************************************************
10.0.0.3 : ok=6 changed=3 unreachable=0 failed=0
10.0.0.5 : ok=7 changed=3 unreachable=0 failed=0
Bandwidthがsender/receiverともに479 Mbits/secとなっています。
https://docs.oracle.com/cd/E97706_01/Content/Compute/References/computeshapes.htm
によるとVM.Standard.E2.1.Microのネットワーク帯域幅は480 Mbpsなので、そのままの結果になったと思います。
OCI CLI・Ansible OCI modulesを入れてみる
Oracle Cloud always free Advent Calendar 2019の8日目です。
昨日はAnsibleをインストールしましたが、本日はそれに続き、OCI CLIとOCI Ansibleモジュールをインストールします。
(昨日インストールしたansible環境が前提です)
#OCI CLIのインストール
[opc@docker ~]$ sudo yum -y install python-oci-cli
#USER OCID,Tenancy OCID,Compartment OCIDの確認(Oracle Cloudの管理コンソール)
USER OCID ・・・・ アイデンティティ->ユーザー で確認したいユーザのOCIDの「表示」をクリックします。
Tenancy OCID・・・ 管理->テナンシ詳細 で確認したいテナンシのOCIDの「表示」をクリックします。
Compartment OCID・ アイデンティティ->コンパートメントで確認したいユーザのコンパートメントの「表示」をクリックします。
#configファイルおよび公開鍵の作成
[opc@docker ~]$ oci setup config
This command provides a walkthrough of creating a valid CLI config file.The following links explain where to find the information required by this
script:User OCID and Tenancy OCID:
https://docs.cloud.oracle.com/Content/API/Concepts/apisigningkey.htm#Other
Region:
https://docs.cloud.oracle.com/Content/General/Concepts/regions.htm
General config documentation:
https://docs.cloud.oracle.com/Content/API/Concepts/sdkconfig.htm
Enter a location for your config [/home/opc/.oci/config]:
Enter a user OCID: ocid1.user.oc1..aaaaaaaariv62l6vabhcskbpj6ytb5i4ymm2s5p3hvnvedvhv27bs623opmq
Enter a tenancy OCID: ocid1.tenancy.oc1..aaaaaaaab2snt4bpmiq72kxirfn6sdcsappqa3fk3sljtbfjtkxsc3pmnfca
Enter a region (e.g. ap-mumbai-1, ap-seoul-1, ap-sydney-1, ap-tokyo-1, ca-toronto-1, eu-frankfurt-1, eu-zurich-1, sa-saopaulo-1, uk-london-1, us-ashburn-1, us-gov-ashburn-1, us-gov-chicago-1, us-gov-phoenix-1, us-langley-1, us-luke-1, us-phoenix-1): ap-tokyo-1
Do you want to generate a new RSA key pair? (If you decline you will be asked to supply the path to an existing key.) [Y/n]: Y
Enter a directory for your keys to be created [/home/opc/.oci]:
Enter a name for your key [oci_api_key]:
Public key written to: /home/opc/.oci/oci_api_key_public.pem
Enter a passphrase for your private key (empty for no passphrase):
Private key written to: /home/opc/.oci/oci_api_key.pem
Fingerprint: ee:1a:98:69:8a:be:34:28:31:c4:7b:1e:1a:19:d9:f6
Config written to /home/opc/.oci/config
If you haven't already uploaded your public key through the console,
follow the instructions on the page linked below in the section 'How to
upload the public key':https://docs.cloud.oracle.com/Content/API/Concepts/apisigningkey.htm#How2
#公開鍵の確認
[opc@docker ~]$ cat ~/.oci/oci_api_key_public.pem
-----BEGIN PUBLIC KEY-----
MIIBIjANBgkqhkiG9w0BAQEFAAOCAQ8AMIIBCgKCAQEAsFb2vXNqzlrsZSWbaBOY
jFsUMsuIf1OcWJ9o+xP2CEm43wIO5R/5aO52SgQwxY6ZQvaNdpWHU2dYB70sWPny
wRMgB6WBon4AhYVqzXbA+2MMAdUMrYnG0rs0ypqrwmudUIfFiVpOhkRErmqdwk8P
・・・・・・・
-----END PUBLIC KEY-----
#公開鍵の登録
Oracle Cloudの管理コンソールから
アイデンティティ->ユーザー
公開鍵を登録したいユーザのユーザー詳細をクリックします。
APIキー->公開鍵の追加をクリックし、先ほど確認した公開鍵の「-----BEGIN PUBLIC KEY-----」から「-----END PUBLIC KEY-----」までを入力します。
#デフォルトコンパートメント値の設定
[opc@docker ~]$ oci setup oci-cli-rc
Predefined queries written under section OCI_CLI_CANNED_QUERIES
Command aliases written under section OCI_CLI_COMMAND_ALIASES
Parameter aliases written under section OCI_CLI_PARAM_ALIASES
#oci_cli_rcファイルにデフォルトコンパートメントIDの登録
[opc@docker ~]$ vi ~/.oci/oci_cli_rc
[DEFAULT]
compartment-id = ocid1.tenancy.oc1..aaaaaaaab2snt4bpmiq72kxirfn6sdcsappqa3fk3sljtbfjtkxsc3pmnfca
#設定の確認
[opc@docker ~]$oci compute image list
{
"data": [
{
"agent-features": null,
"base-image-id": null,
"compartment-id": null,
"create-image-allowed": true,
"defined-tags": {},
"display-name": "Windows-Server-2016-Standard-Edition-VM-Gen2-2019.10.09-0",
"freeform-tags": {},
"id": "ocid1.image.oc1.ap-tokyo-1.aaaaaaaavlzb37igtmrnftw4ulolbdh5ysjyxqq3d4nv72slraedsrjkwyjq",
"launch-mode": "NATIVE",
"launch-options": {
"boot-volume-type": "PARAVIRTUALIZED",
"firmware": "UEFI_64",
"is-consistent-volume-naming-enabled": false,
"is-pv-encryption-in-transit-enabled": true,
"network-type": "PARAVIRTUALIZED",
"remote-data-volume-type": "PARAVIRTUALIZED"
},
"lifecycle-state": "AVAILABLE",
"operating-system": "Windows",
"operating-system-version": "Server 2016 Standard",
"size-in-mbs": 262144,
"time-created": "2019-10-10T04:03:14.266000+00:00"
},・・・・
#Ansible OCI modulesのインストール
[opc@docker ~]sudo yum -y install oci-ansible-modules
#gitのインストール
[opc@docker ~]sudo yum -y install git#oci-ansible-moduleのサンプルをダウンロード
[opc@docker ~]git clone https://github.com/oracle/oci-ansible-modules.git
#sample playbookを使って、インスタンスの起動/削除
[opc@docker ~]cd ~/oci-ansible-modules/samples/compute/launch_compute_instance#今回、always free(VM.Standard.E2.1.Micro)を使い切っているので、VM.Standard.E2.1で試します。
#export SAMPLE_INSTANCE_SHAPE=VM.Standard.E2.1.Micro
[opc@docker launch_compute_instance]export SAMPLE_INSTANCE_SHAPE=VM.Standard.E2.1
[opc@docker launch_compute_instance]export SAMPLE_IMAGE_OCID=ocid1.image.oc1.ap-tokyo-1.aaaaaaaavafdy6turyejyoteynggaogbvmdcy2zwl5ukgy3mww6ohbmrgs7q
[opc@docker launch_compute_instance]export SAMPLE_COMPARTMENT_OCID=ocid1.tenancy.oc1..aaaaaaaab2snt4bpmiq72kxirfn6sdcsappqa3fk3sljtbfjXXXXXXXXXXXXX
[opc@docker launch_compute_instance]export SAMPLE_AD_NAME=FJrI:AP-TOKYO-1-AD-1
#ansible-playbookの実行
#最後までエラーなく実行できればOK
[opc@docker launch_compute_instance]$ ansible-playbook sample.yaml
[WARNING]: provided hosts list is empty, only localhost is available. Note that the implicit localhost does not match 'all'
PLAY [Launch a compute instance and connect to it using SSH] *********************************************************************************************TASK [Gathering Facts] ***********************************************************************************************************************************
ok: [localhost]TASK [Check pre-requisites] ******************************************************************************************************************************
skipping: [localhost] => (item=SAMPLE_COMPARTMENT_OCID)
skipping: [localhost] => (item=SAMPLE_IMAGE_OCID)
skipping: [localhost] => (item=SAMPLE_AD_NAME)
・・・・・TASK [Print SSH response from launched instance] *********************************************************************************************************
ok: [localhost] => {
"msg": "SSH response from instance -> [u'Please login as the user \"ubuntu\" rather than the user \"opc\".']"
}TASK [Terminate the instance] ****************************************************************************************************************************
changed: [localhost]TASK [Delete the subnet] *********************************************************************************************************************************
changed: [localhost]TASK [Delete the security list] **************************************************************************************************************************
changed: [localhost]TASK [Delete the route table] ****************************************************************************************************************************
changed: [localhost]TASK [Delete the Internet Gateway] ***********************************************************************************************************************
changed: [localhost]TASK [Delete the VCN] ************************************************************************************************************************************
changed: [localhost]PLAY RECAP ***********************************************************************************************************************************************
localhost : ok=38 changed=11 unreachable=0 failed=0
<参考>
ansible入れる
Oracle Cloud always free Advent Calendar 2019の7日目です。
今日は環境構築の要であるansibleを入れます。
〇前提 always free ComputeインスタンスのOracle Linux 7.7
#Ansibleのインストール
#yumリポジトリの最新版2.8.4だと後日実施するoci-anbile-moduleと競合するのでひとつバージョン下げてインストール
[opc@docker ~]$sudo yum -y install ansible-2.7.9
#動作確認
#まずはansible操作対象ファイル(hosts)を作成する。54222はSSH接続ポート[opc@docker ~]$ cat <<EOF > hosts
10.0.0.3:54222
10.0.0.5:54222
EOF#ansibleコマンド実行 各ホストでuname -aを実行する --private-key には秘密鍵のパスを指定する
[opc@docker ~]$ ansible --private-key=id_rsa2 -i hosts -m shell -a "uname -a" all
10.0.0.3 | CHANGED | rc=0 >>
Linux docker 4.14.35-1902.6.6.el7uek.x86_64 #2 SMP Tue Oct 8 07:32:21 PDT 2019 x86_64 x86_64 x86_64 GNU/Linux10.0.0.5 | CHANGED | rc=0 >>
Linux ol77 4.14.35-1902.7.3.el7uek.x86_64 #2 SMP Thu Oct 31 10:06:41 PDT 2019 x86_64 x86_64 x86_64 GNU/Linux
Linux docker 4.14.35-1902.6.6.el7uek.x86_64 #2 SMP Tue Oct 8 07:32:21 PDT 2019 x86_64 x86_64 x86_64 GNU/Linx
<余談>
Oracle Linux7でanbileを導入するには、3パターンがあります。
a. python2のpipからインストール
b. python3.6のpipからインストール
c. yumからインストール
aに関しては、python2が2020年1月にサポート終了になるので、各種モジュールのメンテナンスがいつまで続くかわかりません。
bに関しては、現時点(2019年12月)では、以下の不具合がありうまく動きません。(かなりハマって断念)
https://github.com/pycontribs/selinux/issues/22
RHEL7.8では解消されるようなので、半年後は状況違うかもしれませんが。
現状、まともに使えてパッケージメンテナンスを受けられそうなのが、cのyumからのインストールとなります。
仮想デスクトップサーバとして使う
Oracle Cloud always free Advent Calendar 2019の6日目です。
昨日はguacamoleでリモートゲートウェイを作成しましたが、本日はdockerコンテナで仮想デスクトップサーバを構築します。構築後、guacamoleから接続します。
使用するコンテナイメージは、私がRHEL6ベースにXFCEデスクトップ+XRDPで接続できるように作成したものです。
まず、仮想デスクトップ用のコンテナを起動します。
docker run -d --name xrdp -p 3389:3389 --network $(whoami)_default s4ragent/xfce:ja
次に接続用のユーザとパスワード設定をします。
以下の例はuser:foo password:bar です。
docker exec xrdp bash -c 'useradd foo'
docker exec xrdp bash -c 'echo "foo:bar" | chpasswd'
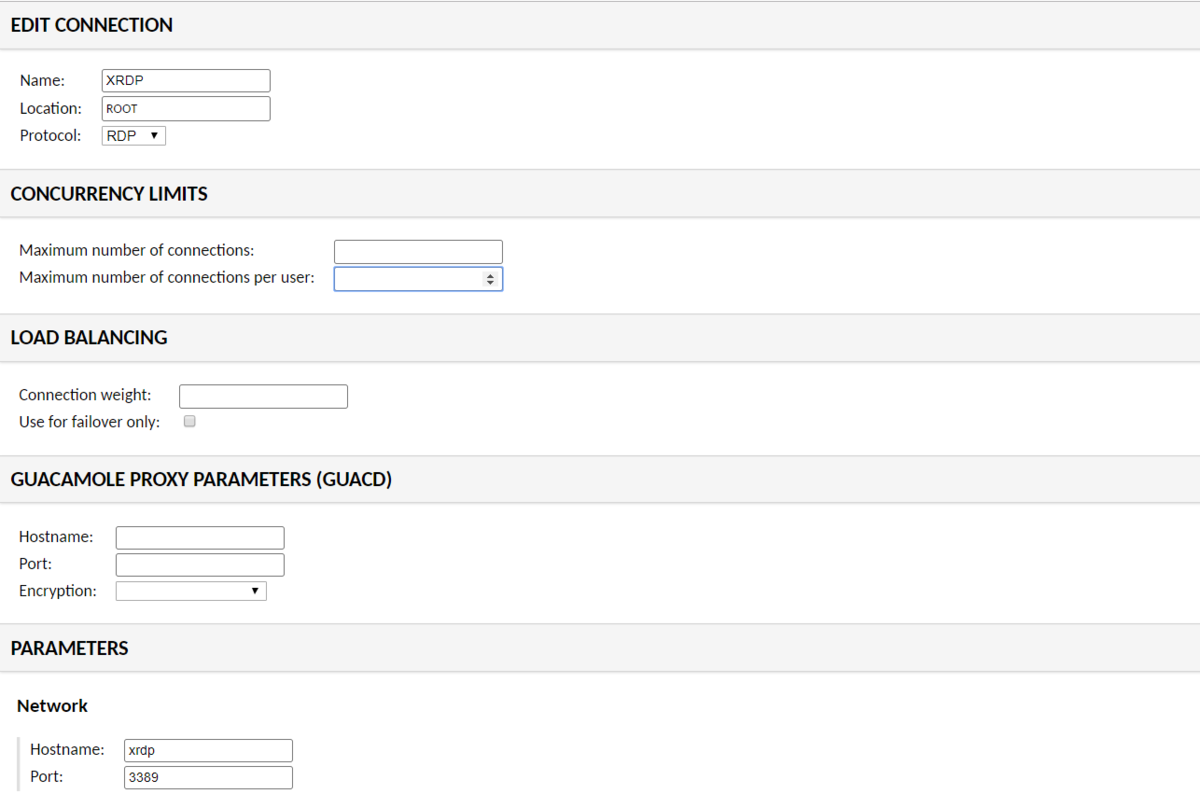
パスワードが設定できたら guacamoleのsettings->connectionから接続用の設定を作成します。

NAMEはなんでもよいですが、
PARAMETERSのHostnameにはxrdp、Portは3389を入力してください。
設定ができたら、Homeから接続します。

この画面では、XRDPをクリックします

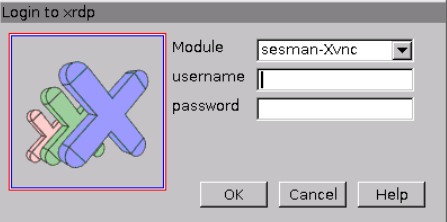
ここで先ほど作成したユーザ/パスワードを入力します。

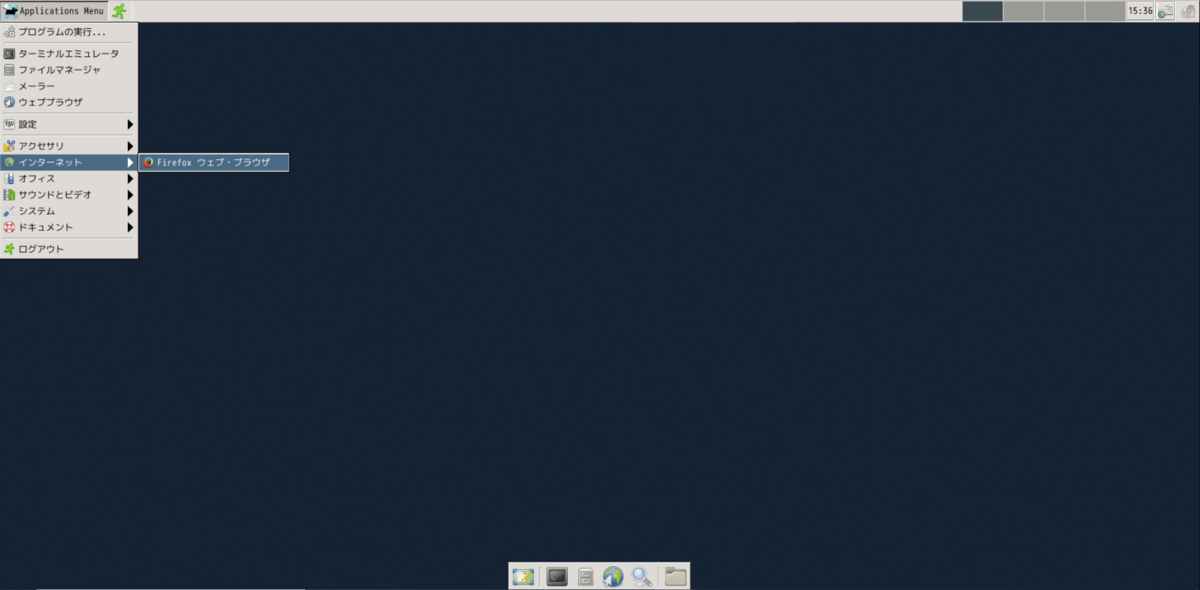
入力後、デスクトップ画面が現れます。
日本語入力はできませんが、インターネットを見ることは出来ますので、
興味がわいたら使ってみてください。
guacamoleで作るリモートゲートウェイ
Oracle Cloud Infrastructure Advent Calendar 2019
Oracle Cloud always free Advent Calendar 2019
の5日目です。
今日はリモートゲートウェイ用のソフトウェア(apache guacamole)をalways freeのComputeインスタンスに導入しようと思います。
guacamoleはWEBベースのソフトウェアなので、今回はポート58443(SSL)で公開しようと思います。guacamoleの構築が終わったら、起動済みのOracle Cloud上のWindowsインスタンス★に接続します。
★always freeではないので、あくまで動作確認用です。
まずは、Oracle Cloud側のセキュリティポートの設定です。
〇セキュリティリストの追加
oracle cloudコンソールから
ネットワーキング-仮想クラウド・ネットワーク-VirtualCloudNetwork-XXXXXXXを選択
パブリック・パブリックサブネットをクリック
Default Security List for VirtualCloudNetwork-XXXXXXXXXをクリック
イングレス・ルールに以下を追加
ソース 0.0.0.0/0
IPプロトコル TCP
宛先ポート範囲 58443
イングレス・ルールに以下を追加
ソース 10.0.0.0/24
IPプロトコル TCP
次にOracle Linux側でも同様にポート58443 を公開します。
#firewalld設定ファイルのコピー
sudo cp /usr/lib/firewalld/services/ssh.xml /etc/firewalld/services/nginx-58443.xml
sudo vi /etc/firewalld/services/nginx-58443.xml#設定ファイルの編集
#<port protocol="tcp" port="22"/>
<port protocol="tcp" port="58443"/>sudo firewall-cmd --permanent --add-service=nginx-58443
#設定のリロード
sudo firewall-cmd --reload#変更の状態確認
sudo firewall-cmd --list-all#servicesにnginx-58443があればOK
公開ポートの設定が終わったら、guacamoleを導入します。
guacamoleはdocker上で動作させることができます。
SSL化するにあたり、nginxをguacamoleのproxyサーバとして動作させます。
(guacamoleのproxyとして動作するようnginxのdockerイメージを用意しました)
最初にDB初期化用のsqlファイルを出力します。
sudo docker run --rm guacamole/guacamole /opt/guacamole/bin/initdb.sh --mysql > initdb.sql
次にdocker-compose用のymlファイルを作成します。
cat <<EOF > docker-compose.yml
version: '3'
services:
nginx:
image: s4ragent/nginx:latest
container_name: nginx
hostname: nginx
ports:
- '58443:443'
guacd:
image: guacamole/guacd:latest
container_name: guacd
hostname: guacd
expose:
- '4822'
guacamole:
image: guacamole/guacamole:latest
container_name: guacamole
hostname: guacamole
ports:
- '8080:8080'
environment:
MYSQL_HOSTNAME: 'mysql'
GUACD_HOSTNAME: 'guacd'
MYSQL_DATABASE: 'guachamole'
MYSQL_USER: 'guachamole'
MYSQL_PASSWORD: 'guachamole'
mysql:
image: mysql:5.7
container_name: mysql
hostname: mysql
environment:
MYSQL_ALLOW_EMPTY_PASSWORD: 'yes'
MYSQL_DATABASE: 'guachamole'
MYSQL_USER: 'guachamole'
MYSQL_PASSWORD: 'guachamole'
volumes:
- './initdb.sql:/docker-entrypoint-initdb.d/initdb.sql:z'
EOF
docker-compose.ymlファイルが用意できたら、コンテナを起動します。
sudo /usr/local/bin/docker-compose up -d
Creating network "opc_default" with the default driver
Creating mysql ... done
Creating nginx ... done
Creating guacd ... done
Creating guacamole ... done
作成が完了したら以下のURLにアクセスします。
https://computeインスタンスのIP:58443/guacamole/

初期パスワードはguacadmin/guacadminです。
Settings-> Preferences でまずはパスワードを変更しましょう。

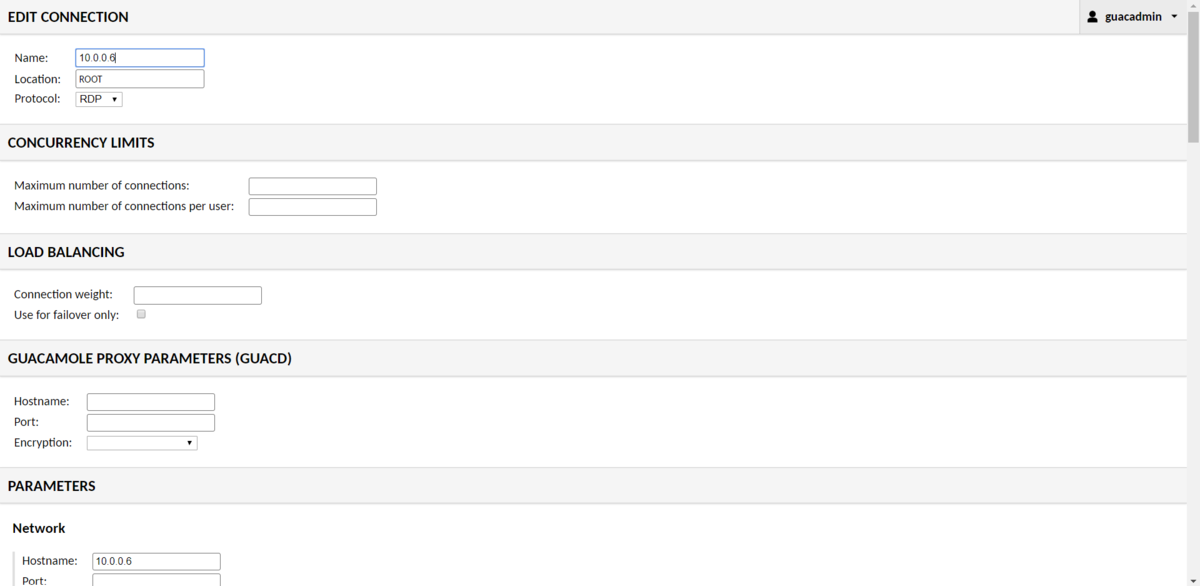
パスワードを変更したらWindowsインスタンスに接続する設定を作成します。
Settings-> connectionから作成します。


設定が終わったらHomeから接続します。

画面上の10.0.0.6をクリックするとWindowsインスタンスへの接続が始まります。


今回はRDP接続を紹介しましたが、SSHやVNC,TELNETなども使用できます。
非常に便利なので、ぜひ使ってみてください。
<参考文献>
ブラウザ経由で Windows Server にリモート接続ができる「Apache Guacamole」を Docker Compose で起動する - kakakakakku blog
docker-composeで作成されるものの名前を明示的に指定する方法 - Qiita